
Nail wraps are something that I have never really used … despite having a few samples of them in the past, they’ve always ended up at the back of the draw! I have always assumed rightly or wrongly that they would wreck my nails. As my nails have always been weak and easily breakable I have stuck to focusing on finding products that will aid them to grow rather than risking my nail using anything that might dry them out or make my nails any weaker!
A month ago I received a complimentary sample of Jamberry wraps to review and my nails have been in pretty good condition recently so I thought I would give them a go.
Laila Samson sent me a sample set the wraps to try and then review my thoughts.

Sample wraps sent by Laila Samson
Being all different designs I decided to use them as accent nails which I thought to be a good idea as I could then create more looks with different colours of nail varnish and show the wraps as accents. I have now tested the wraps three times and here’s how I got on.
APPLICATION INSTRUCTIONS (as taken from Laila’s website)
- Nail Prep: Push back cuticles. Buff and clean nails with a Nail Prep Wipe or Nail Prep Cleanser.
- Match nail wrap that best fits your nail. Err on the smaller size to avoid overlapping on the skin/nail edges, which can cause lifting.
- Cut nail wrap in half, pick up wrap from the cut side with an orange stick, and peel away from clear backing sheet.
- Warm the adhesive side of nail wrap with a Mini-Heater or blow dryer for about 3 seconds. Avoid overheating.
- Press nail wrap onto nail with the rounded edge at the cuticle. Firmly smooth the nail wrap down the center of the nail toward the tip. Next, smooth the sides starting at the center and toward the edges to seal the nail wrap to the nail.
- Trim excess with nail scissors. File off remaining nail wrap using a downward motion.
- Apply heat and pressure to the nail wrap until it is bonded to the nail.
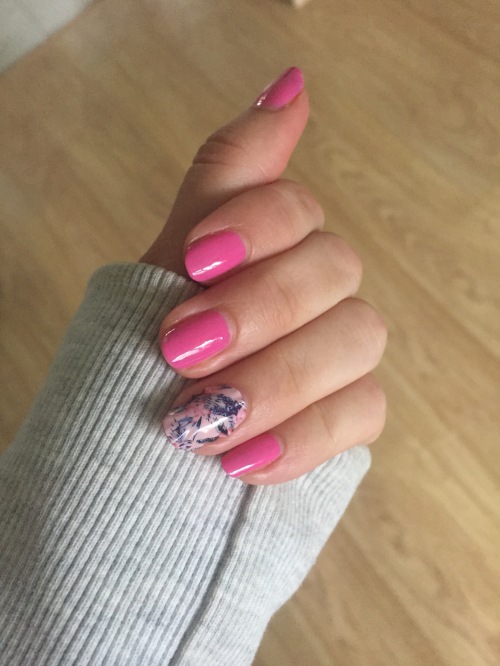
I painted my nails pink and took the pretty pastel pattern for my accent. I think the only mistake I made here was not trimming the wrap in width before applying so I did end up with tiny air bubbles but for a first attempt it wasn’t too bad! I cut the wrap in half so that I could apply to two nails, heated it slightly then pressed it down on my nail, trimming the edges and pressing out any air bubbles.


You can see the small air bubbles but this was my fault for not trimming the width of the wrap!

I really liked this combination!
This was after a week! The wraps were still securely on my nails!
REMOVAL INSTRUCTIONS
- Soak the nail wrap in our Nail Wrap & Lacquer Remover for 20-30 seconds.
- After soaking, gently peel the nail wrap from side to side.
- Finally, apply Cuticle Oil for a winning finish!
I used my usual nail polish remover….which was acetone free (I expected to have to use an acetone one!!) and soaked the nail for 20 seconds….it came away so easily that there was barely any damage to the nail polish underneath let alone the nail!!!

Removal was super easy!!!
I have applied the wraps a few more times since and have found it easier to apply since I trim them as best I can to fit. Personally I do struggle with my right hand as I find I need to trim the end with scissors that I find difficult with my left hand!! I try to trim it down as much as I can before I apply but I don’t want to go too low before applying them! I then file downwards to get rid of any small bits left at the top. The more I apply them, the more I am getting used to them!!
Here’s some more looks:

After breaking a nail I was glad to apply the lace wrap to my accent nail to take away the focus from that little stubby nail next to my thumb!! Hahaha! (Housework is dangerous….just saying!!)
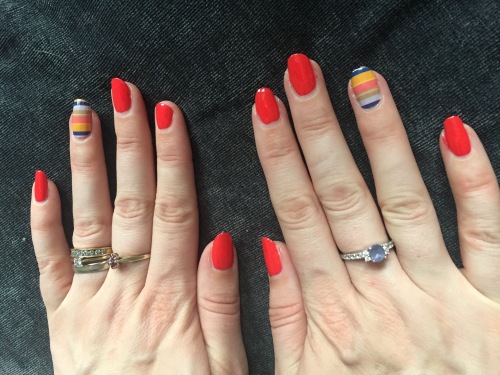
Trying another pattern that would go with any nail colour!
Would I recommend?
I would recommend Jamberry wraps as they are easy to apply (with practice…you need to practice if you haven’t used them before!!), they last really well … at a guess mine would have lasted almost two weeks if I wasn’t so keen to try a new design!! They are super easy to remove and have no damaging effect whatsoever to the nail! They survived housework, cleaning the bathroom, kitchen, washing my hair (I tend to chip my nails very easily!!!) they have not budged! The wraps are non-toxic and free from Dibutyl Phthalate, Toluene, Formaldehyde, Formaldehyde Resin, and Camphor.
If you’d like to check out Jamberry Nail wraps take a look for yourself using these links:

Thanks for reading! Let me know what you think in the comments box below or on my facebook page. Follow me on Instagram, Twitter and Facebook….links below🙂
Facebook……….Twitter……….Instagram
Disclaimer: These items were sent to me for review by Laila Samson. All opinions expressed are my own and it was my choice to add links to any websites throughout this post. Any website links included are not affiliate links and I will not earn commission through you using any link in this post.

These are cute!
LikeLiked by 1 person
Thanks, I really like them! I have more to try yet so will be posting looks on my Instagram when I use them 😛 xx
LikeLiked by 1 person
Okay !!
LikeLiked by 1 person
Amazing👌👌👌
LikeLiked by 2 people
Thank you 💕💅🏼
LikeLike
these are cute! I love that you used them as an accent nail 🙂
LikeLiked by 1 person
Thank you! I’d never really done an ‘accent nail’ before but I quite like it 😛 xx
LikeLiked by 1 person
I’ve used these before and I really quite liked them. They are fiddly but it is a great way to get intricate designs. Great review 🙂
Emma | Rosy Disposition
LikeLiked by 2 people
Thanks for reading. Yes, fiddly but worth it 🙂 I think the more you do it the easier it becomes 🙂 xx
LikeLike
Jamberry have so many cute designs to choose from. I love the manis you created, using the wraps as feature nails xx
Indie// In Search of the Holy Grail
LikeLiked by 2 people
Thank you! Yes, they do! I’ve been checking out other designs as I think this could become something I’d like to do more regularly 😛 x
LikeLike
These are ones that I like if ever I want to paint my nails. I am not a fan of the coffin ones.
LikeLiked by 2 people
I’m really liking them 🙂 xx
LikeLike
I always thought this kind of thing wouldn’t last either or might be difficult to remove. I’ve never tried them but might give them a go sometime! Lovely designs, they look fab!!
Lovely post as always. Xx
LikeLiked by 2 people
If you check out the Facebook group, there’s sometimes posts on there saying to let her know if you’ve never tried them before and request a sample! They last really well….I was surprised but more so with removal! They come off so easily! xx
LikeLike
I love these, they look very professional too. Great post!
LikeLiked by 2 people
Thank you!! I’m really liking them 💅🏼💋
LikeLiked by 1 person
I like Jamberry! I don’t use them too often but my sisters and mom are obsessed! I always use coconut oil with the cuticle pusher to remove them!
LikeLiked by 1 person
Ahh that sounds like a good way to remove them too! xx
LikeLiked by 1 person
I have never been able to master nail wrap
LikeLiked by 2 people
Have you tried Jamberry? They’re pretty easy I think xx
LikeLike
I really dk what kind I received. They were mainly gifts
LikeLiked by 1 person
Unfortunately as much as I have tried, I haven’t been able to get Jamberry wraps to work for me. They are just too stiff or thick for my curved nails. I think they work better on flatter nails. On my very curved nails they never lay down and start lift within hours of application. They are so cool though and I love all the designs!
LikeLiked by 1 person
Oh no that’s a shame…I take it you’re heating them up enough? That’s what makes them adhere. Thanks for reading xx
LikeLiked by 1 person
Yes, I blow dry them like crazy, maybe the special heater lamp would work better but I’m not so interested in spending money on that just to have it not work out. But I can definitely admire them on other people!😍
LikeLike